Chocolate Sticky Toffee Pudding!

I first made this dessert years ago, for a family Thanksgiving while I was in college. I was a beginner baker, and in fact this was the first occasion wherein I ever chopped dates. From then on, dates have had a hold on me and I will forever champion their degree and flavor of sweetness.

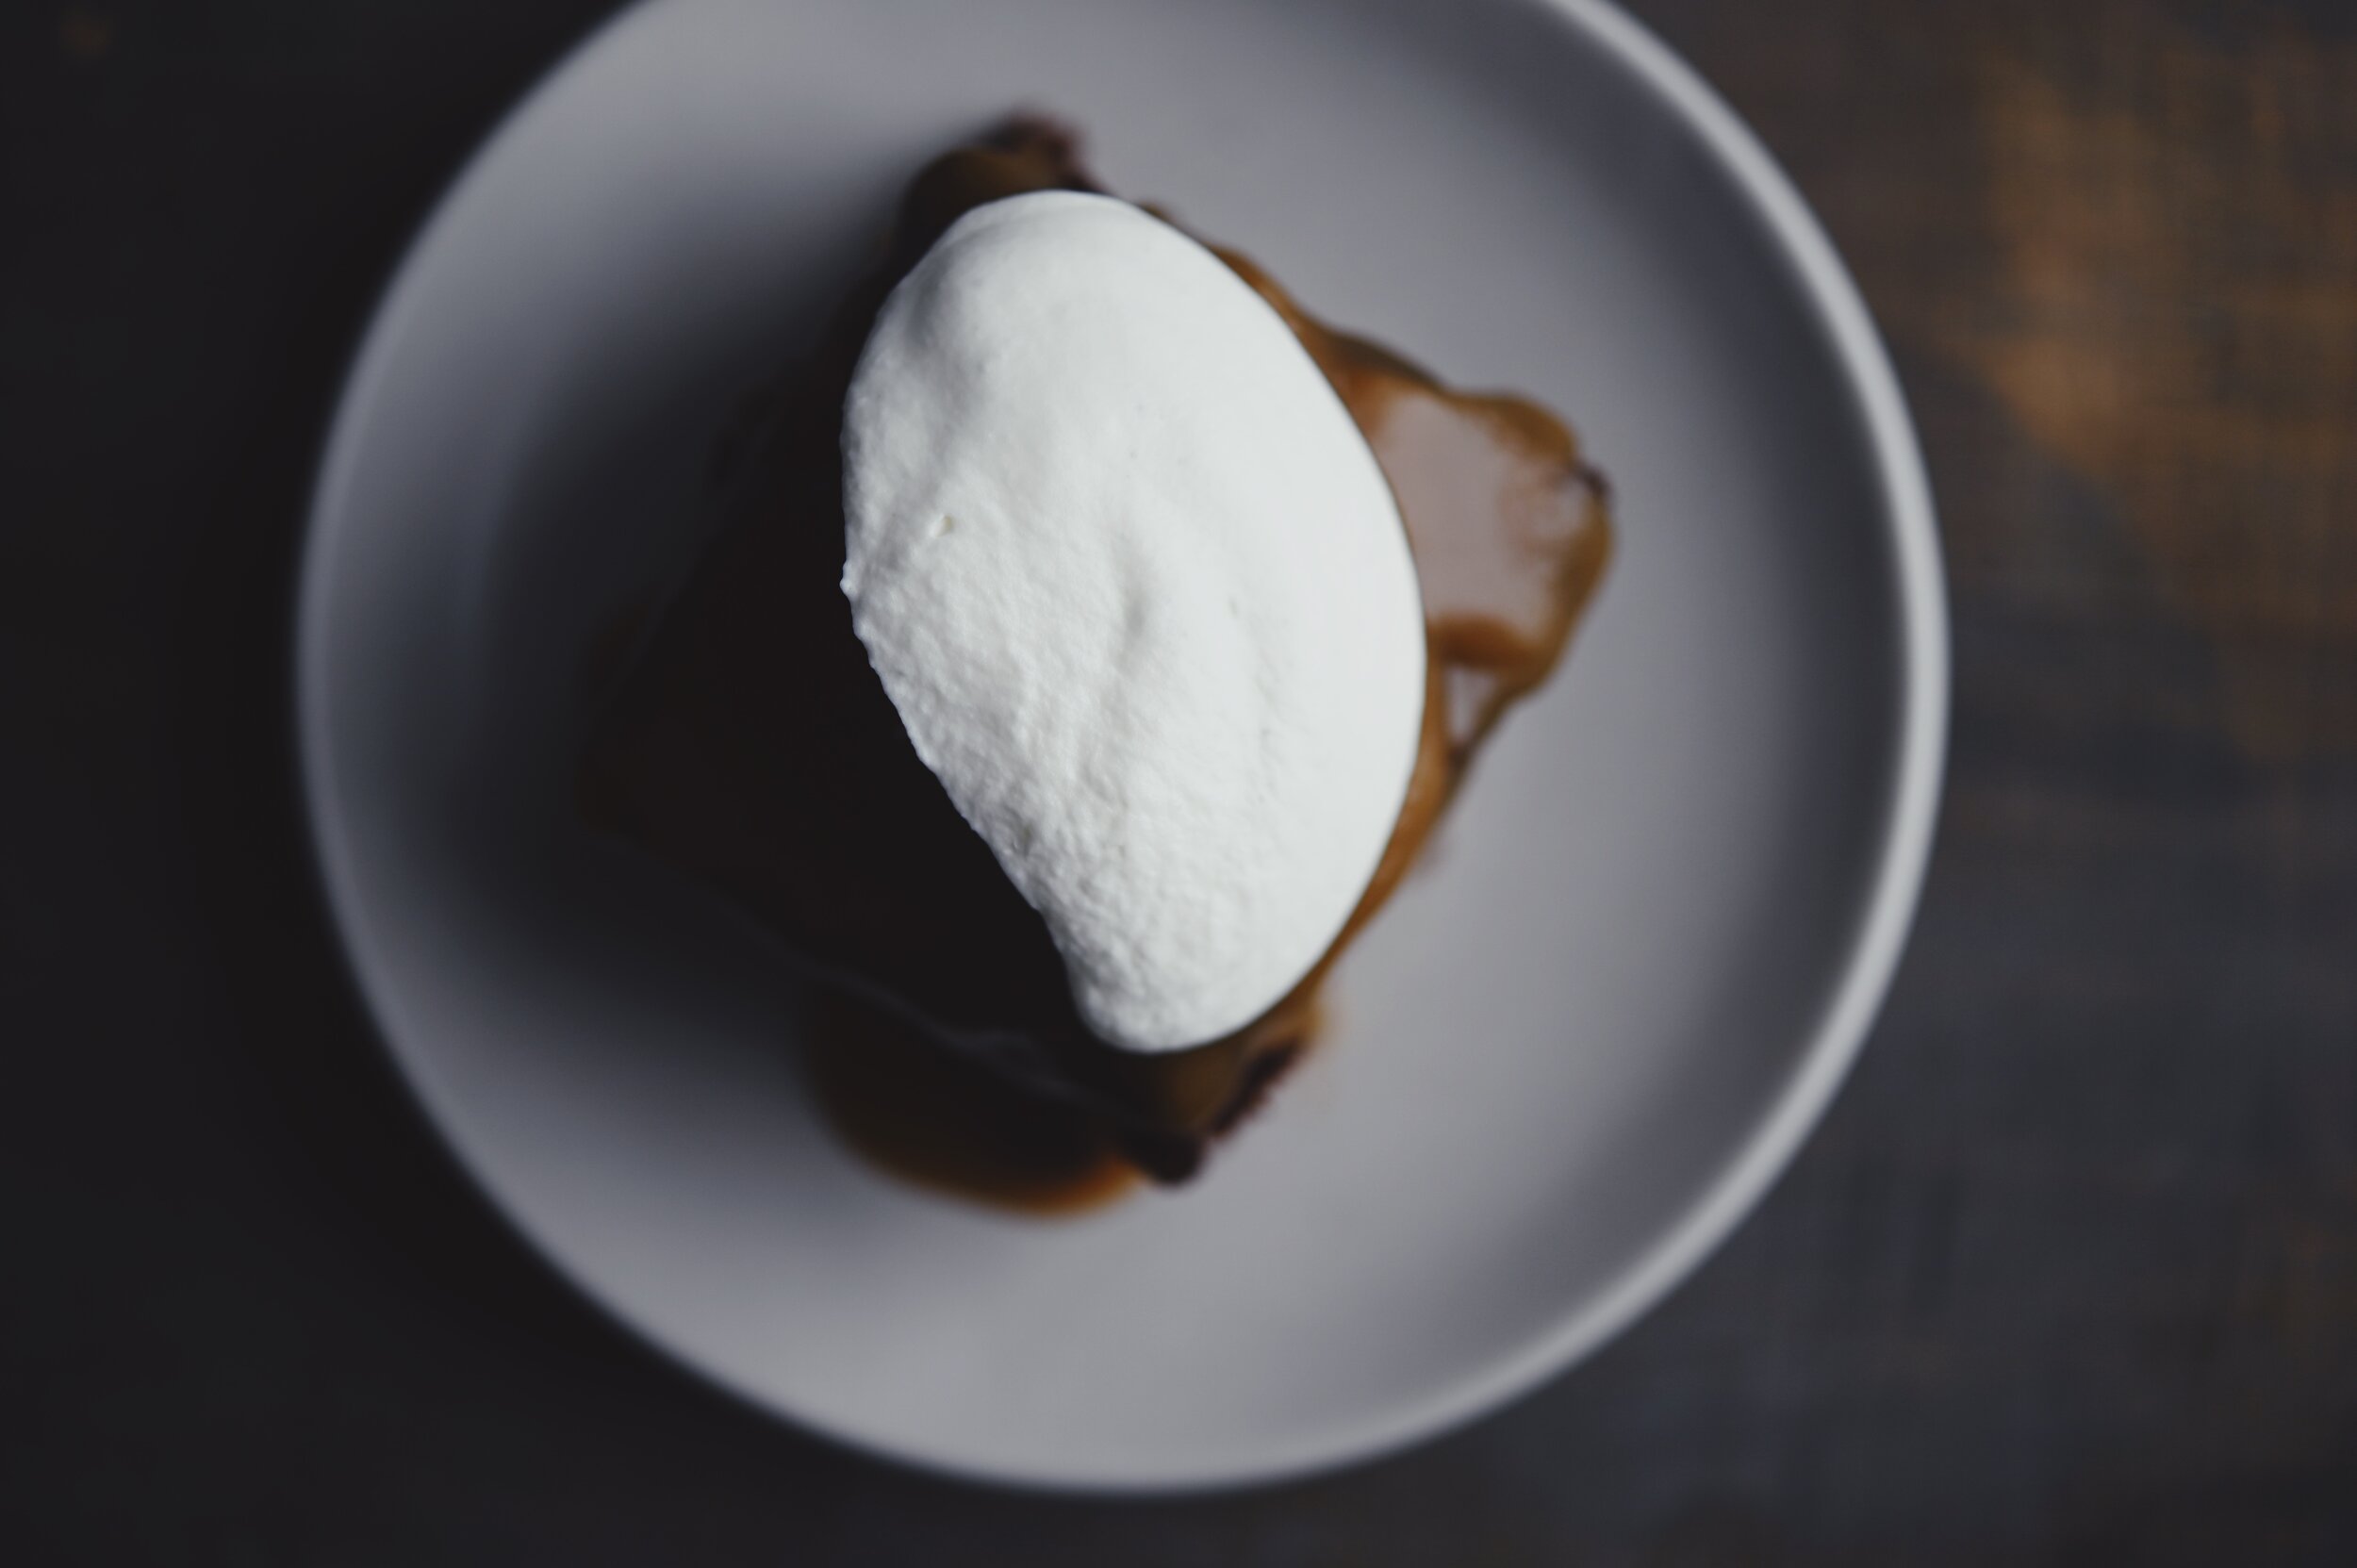
Unlike a layer cake or pie, sticky toffee pudding is the kind of dessert that doesn’t necessarily “show” well, but is invincibly superior as a whole, plated affair. As in every baking endeavor but perhaps especially here, balancing temperatures and timing is key—cozying up with warm, soft cake that’s dripping with hot toffee sauce and dolloped with cool unsweetened cream is winter evening perfection, I think.

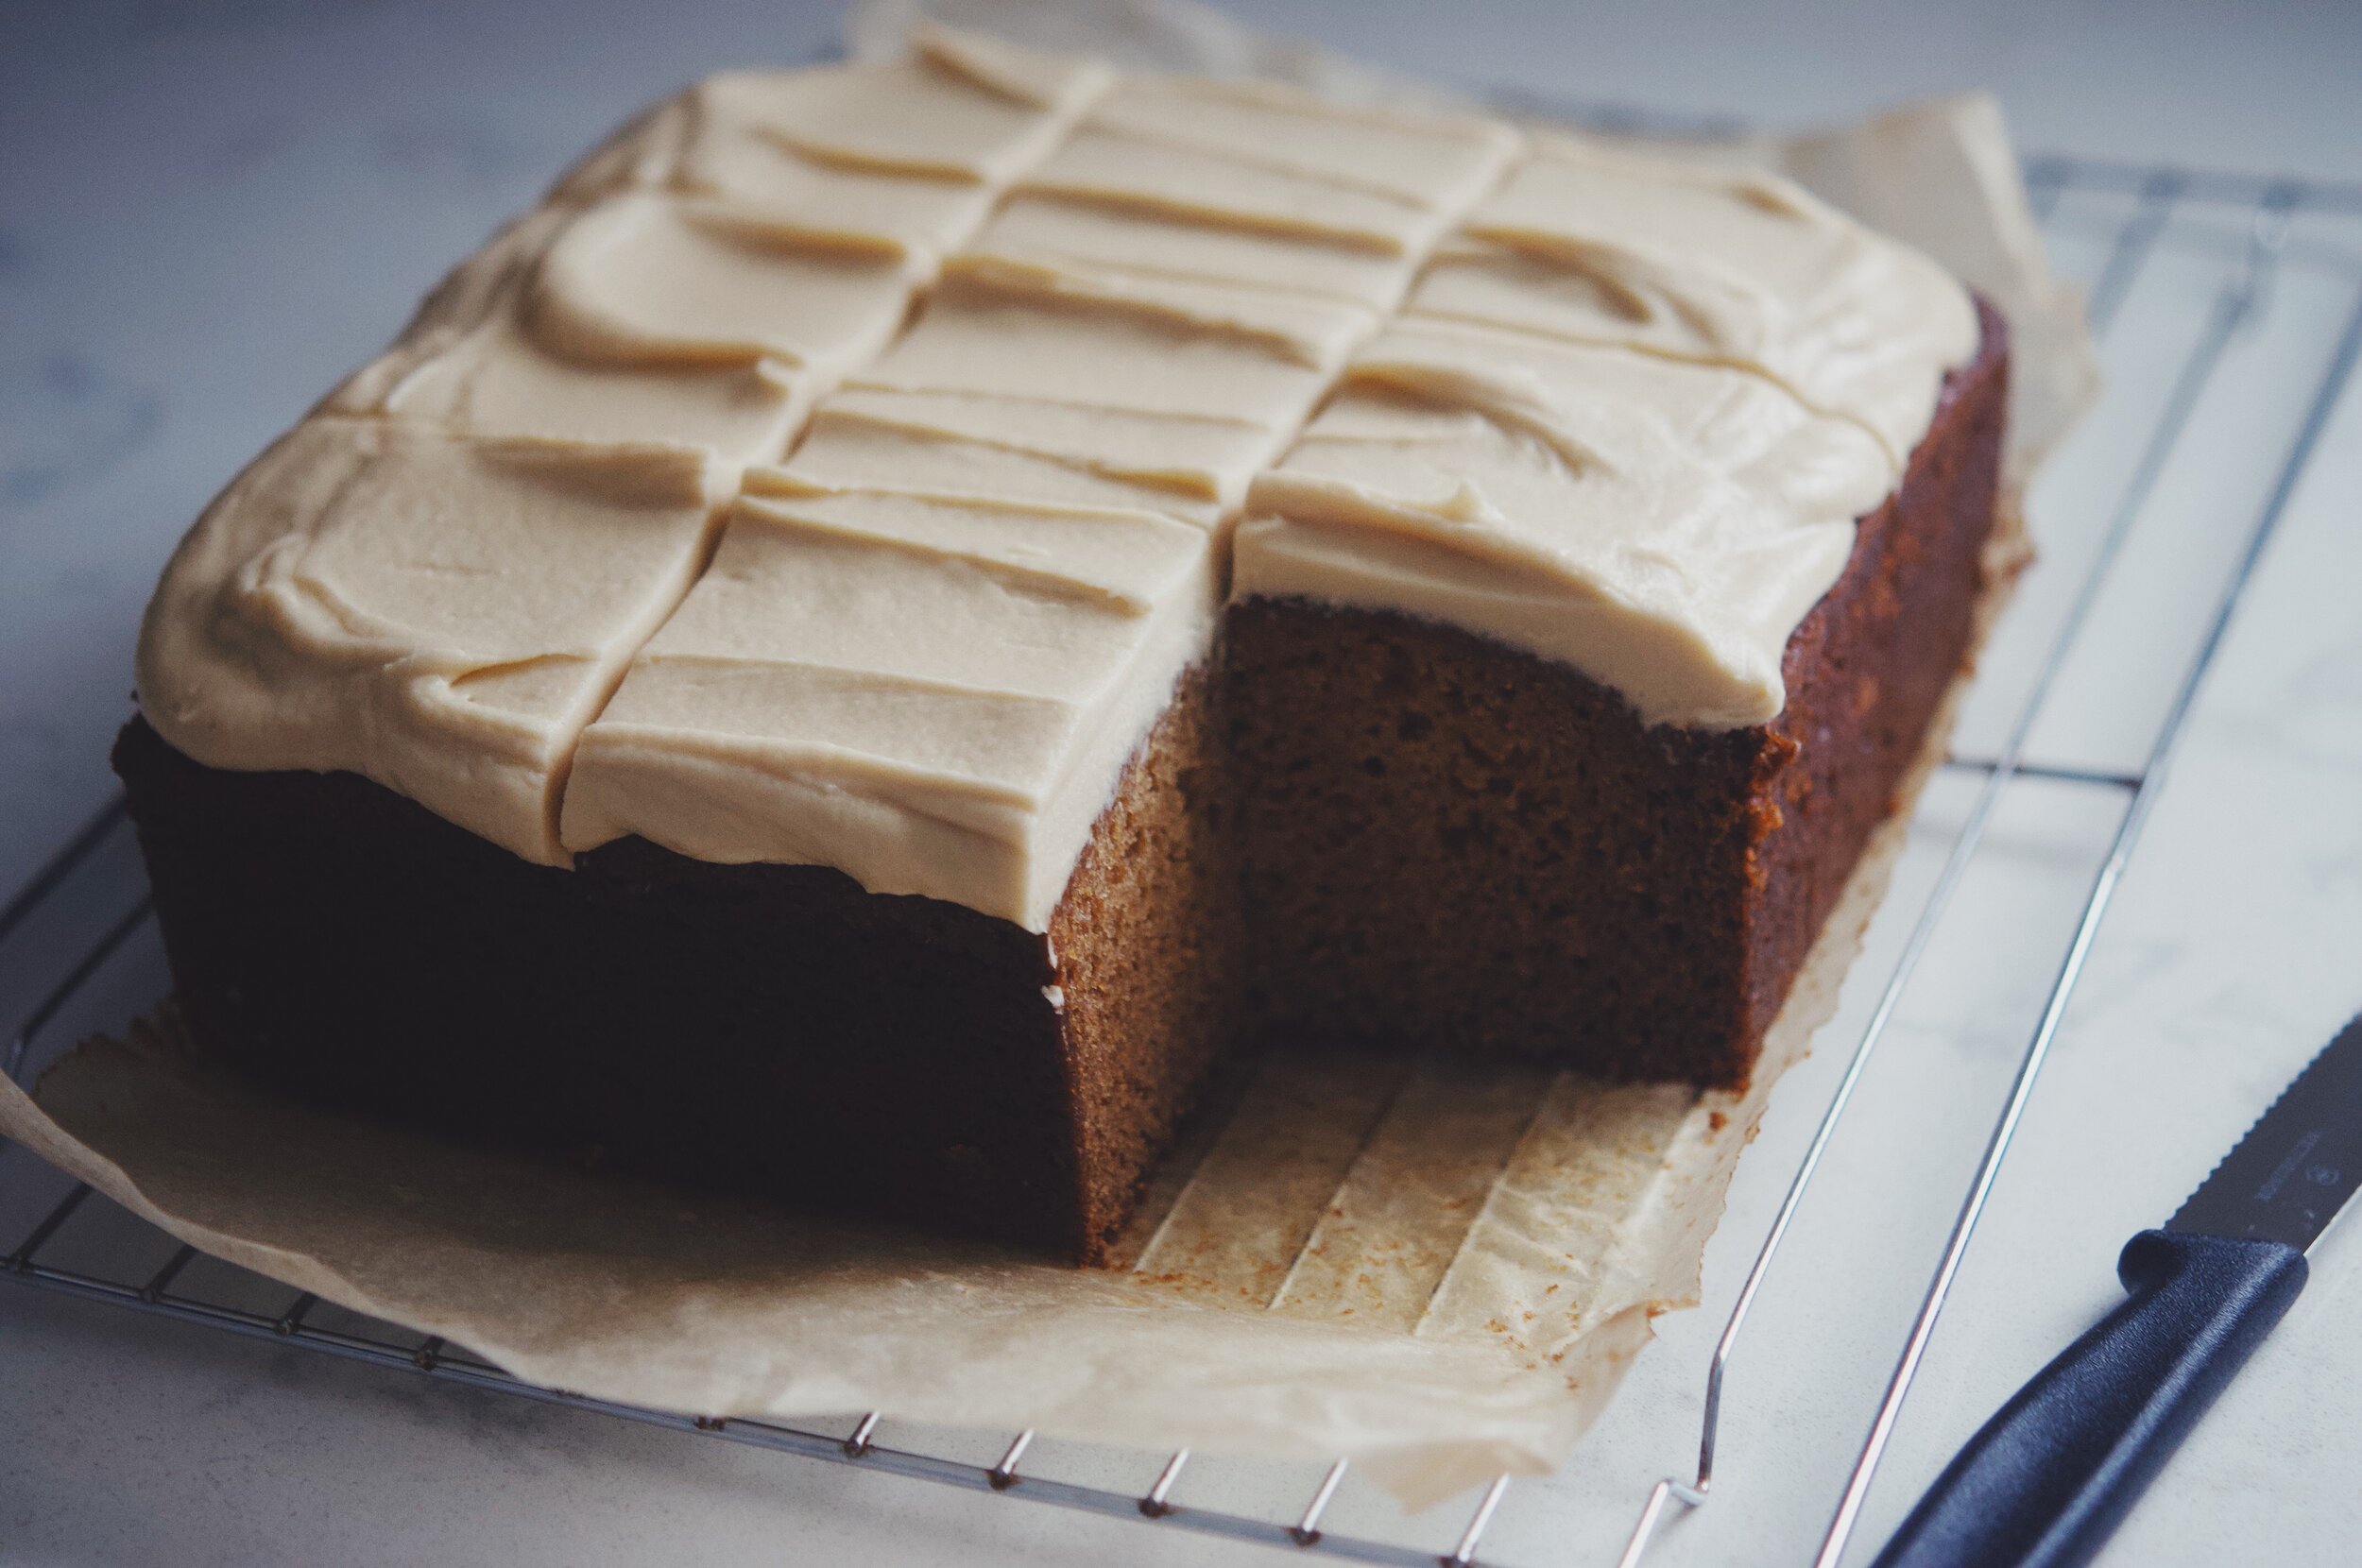
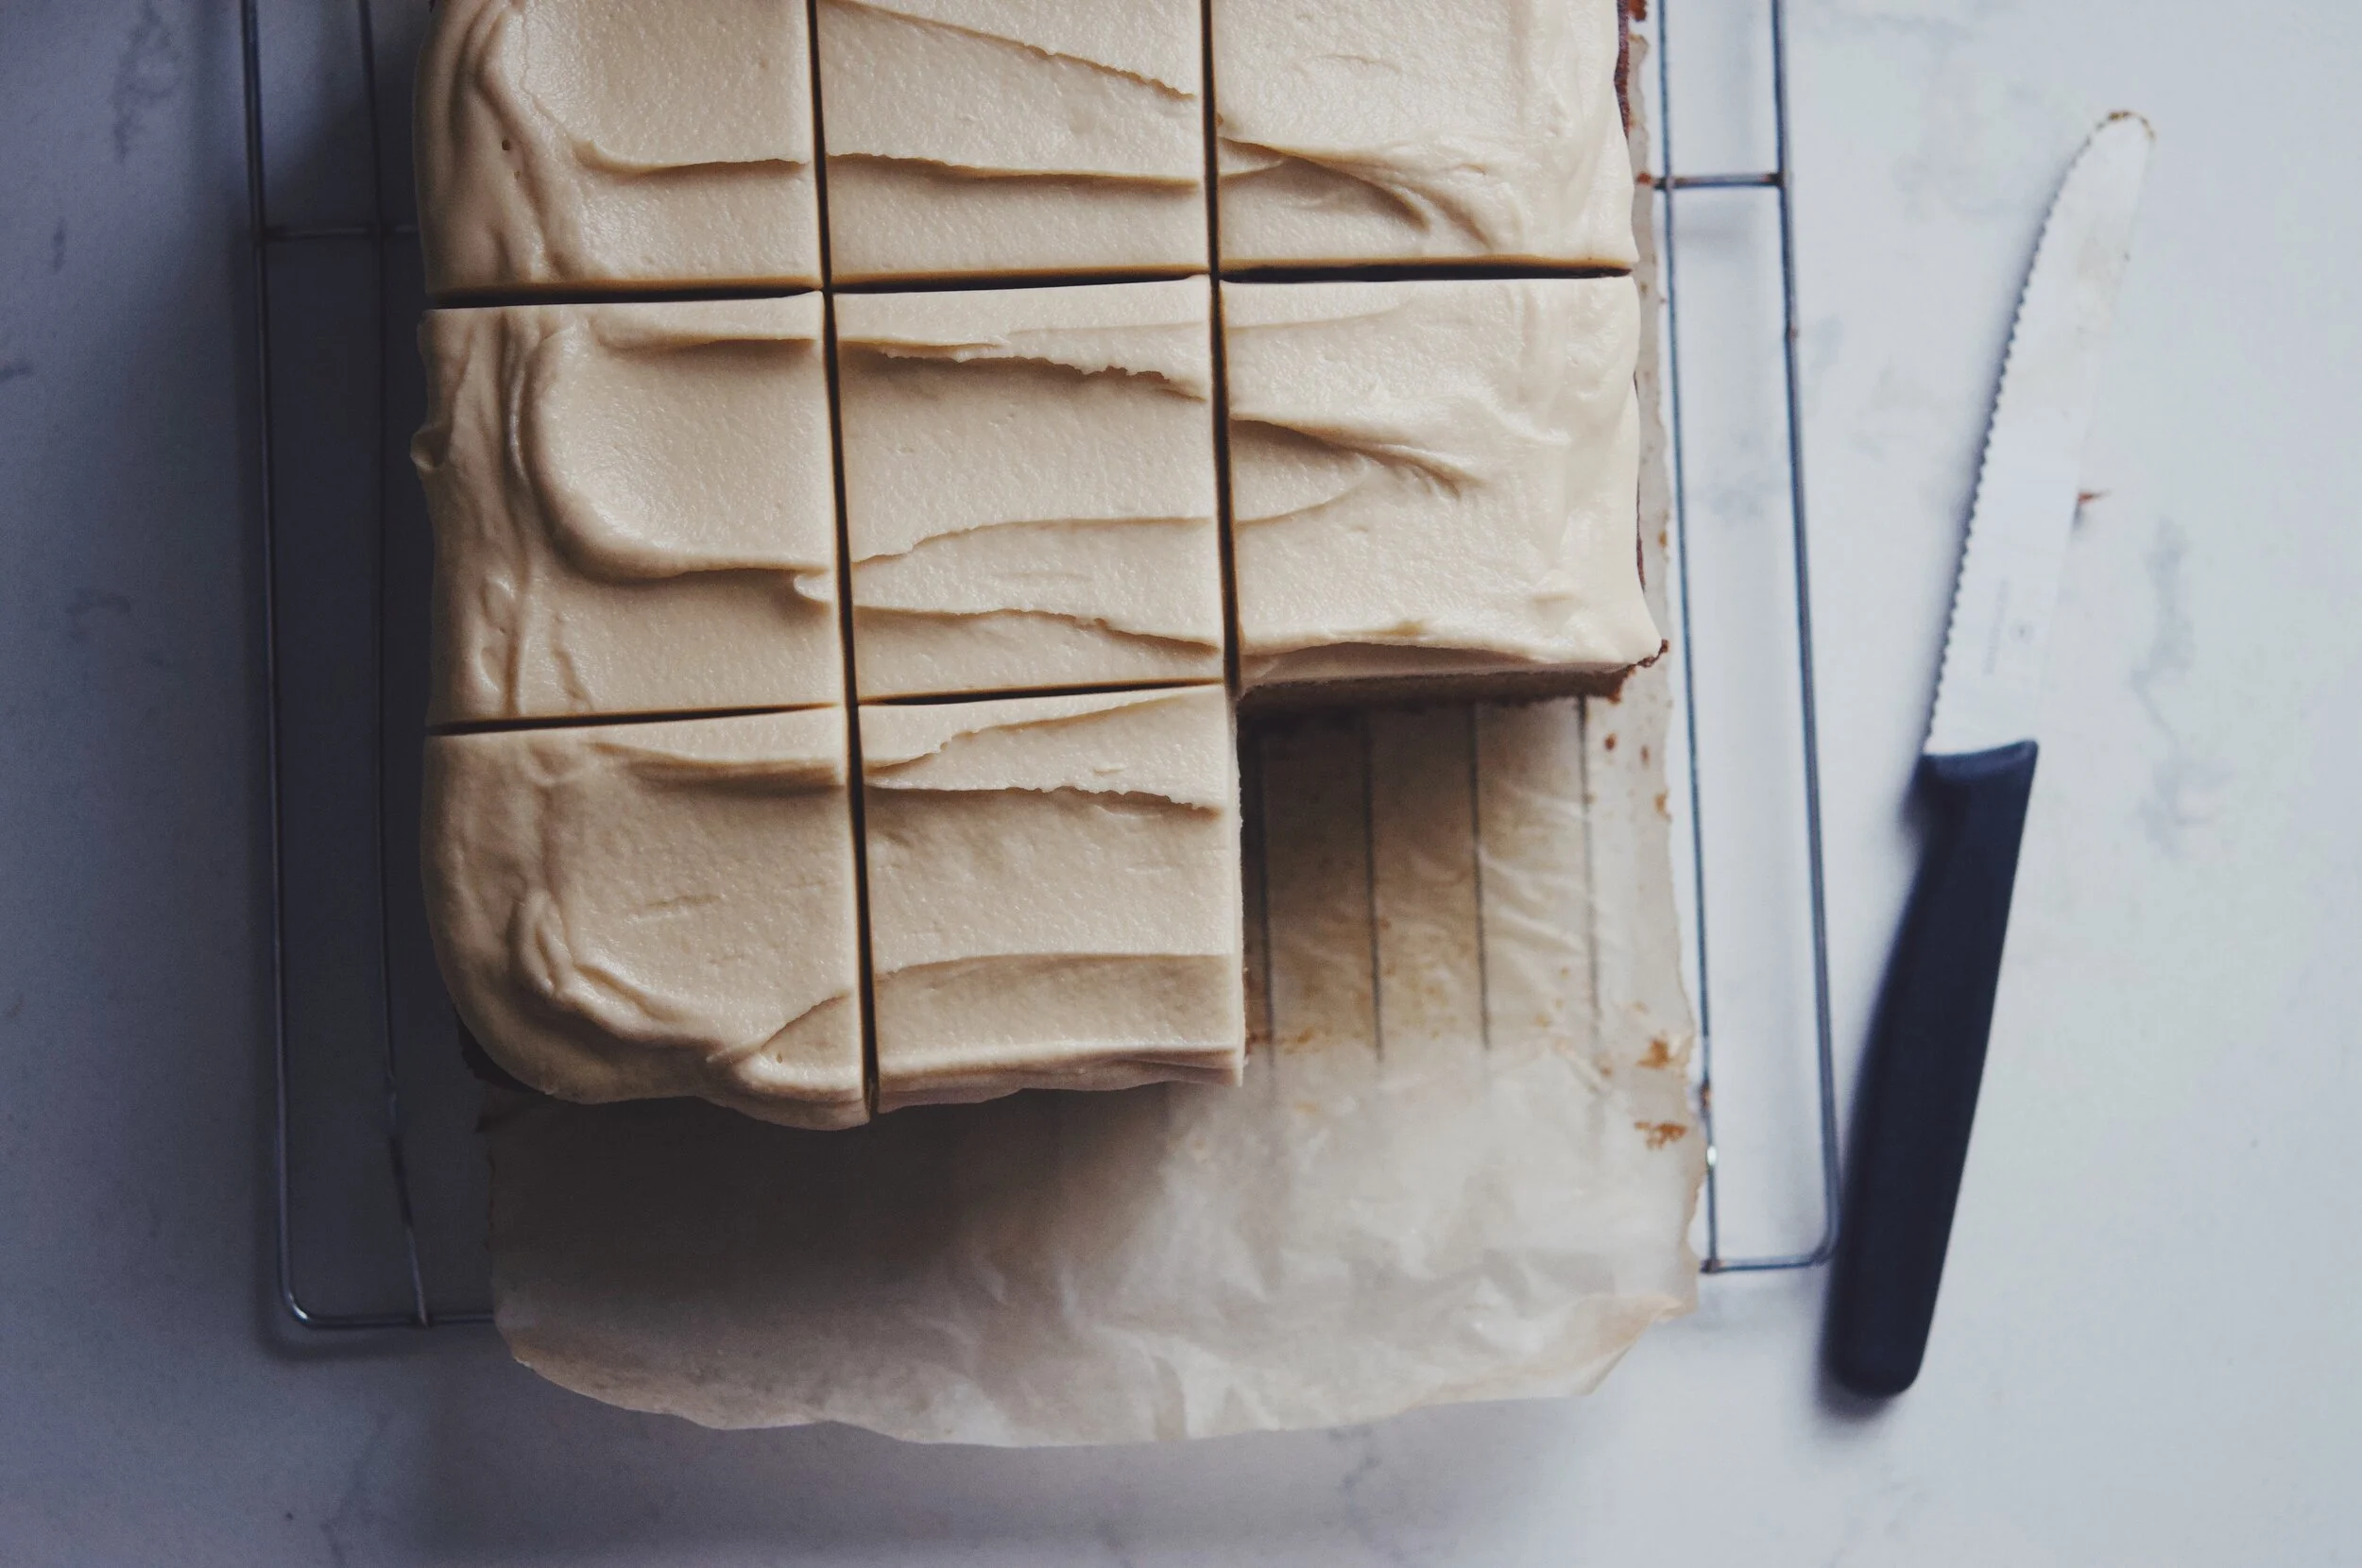
Oh and! need to mention that while I’ve never met a sticky toffee pudding that I didn’t love, the chocolate addition here really makes this one particularly great. It’s the fudgiest cake imaginable without resembling a brownie, dense and yet nearly melts in your mouth. “Squidgy” is the right British term for it, meaning damp, spongy, and moist (in the best of ways!). I’ve also enjoyed it leftover at room temp days later—it seemed to have only gotten better!

2E8AC2C0-0BA5-4EAE-9FCB-12AACA590E6A-BADCC82E-F5CD-4820-9326-37A871526AEA.JPG

Chocolate Sticky Toffee Pudding

serves 9 - adapted from crave: a passion for chocolate by Maureen McKeon

cake

  • 1 1/2 ( g) chopped, pitted dates

  • 1 t baking soda

  • 114 g (1/2 c) unsalted butter, at room temperature

  • 133 g (2/3 c) granulated sugar

  • 2 large eggs, room temperature

  • 170 g (1 1/2 c) self-rising flour

  • 6 oz. (1 c) chopped dark bittersweet chocolate, melted and slightly cooled

toffee sauce

  • 114 g (1/2 c) unsalted butter

  • 140 g (2/3 c) dark brown sugar

  • 240 g (1 c) heavy cream

  • 3/4 t kosher salt

  • 1 t vanilla extract

  • splash of brandy

whipped heavy cream, unsweetened, to serve

  1. Preheat oven to 350 F. Butter a deep 8” or 9” square cake pan, and line the base with parchment paper.

  2. Put the dates in a medium/small saucepan and cover with 240 g (1 cup) water; bring to a boil and simmer for 3 minutes. Remove from heat and add the baking soda. Set aside to cool slightly.

  3. Using an electric mixer fitted with the paddle attachment, beat the butter and sugar together until pale and fluffy, about 5-10 minutes. Scrape the sides of the bowl down and add the eggs one at a time, beating well and scraping the sides/bottom of bowl between each addition.

  4. Gently fold in the sifted flour with a large spatula until just incorporated, followed by the date mixture. Finally stir in the melted, cooled chocolate, until just combined.

  5. Pour mixture into the prepared pan and bake for around 45 minutes, or until the cake shrinks back from the sides of the pan and the middle springs back slightly when pressed.

  6. Make the caramel sauce while the cake is baking: combine the butter, sugar, and cream in a small/medium saucepan and bring to a boil, stirring constantly. Reduce the heat and simmer for 5-10 minutes, or until caramel has thickened into a pourable but sturdy sauce. Remove from heat and add the salt, vanilla and brandy.

  7. Finally, cut the warm cake into squares, and serve with spoonfuls of the hot toffee sauce and unsweetened whipped cream! Enjoy!

DBE5C381-4E46-48FB-88E6-B6A3CFC1FBCC-46EAF46F-5721-4B77-B0BC-FFD78BABF14F.JPG
17C73C68-D2CB-4D95-8CAE-B9C899BACDFE-C24BE570-A1C9-464F-B21A-EC0933CD5166.JPG

ginger cake + fudgy toffee frosting!

Kansas City finally got some snow this week, and I couldn’t have been more excited. I love watching it from the window, the opaque quality of light. I find it simultaneously calming and energizing; what to bake on a cozy snow day??

Ginger cake with fudgy toffee frosting, obviously! This cake is simplicity at its finest; soft and sweetly spiced cake blanketed with a luscious, buttery toffee frosting. A cheering accompaniment to coffee in the morning, and perhaps even better alongside a whiskey nightcap.

8D67C5F0-FA4B-4BE2-9422-F6E84EF33811.JPG

Ginger Cake + Fudgy Toffee Frosting

Yields one 9” square cake

Cake:

28C8F5F4-A5E2-41EA-8A0A-0FB1A7865208.JPG
  • scant 1 cup (225 g; 2 sticks) unsalted butter

  • 1 cup + 2 T (225 g) packed light or dark brown sugar

  • 1/2 cup (200 g) Lyle’s Golden Syrup (or honey, or light corn syrup)

  • 1 T molasses (preferably blackstrap)

  • 2 xl eggs

  • 1 1/4 cups (300 g) whole milk

  • 2 1/2 cups (325 g) all-purpose flour

  • 1/2 cup (50 g) almond flour

  • 1/2 t kosher salt

  • 2 t baking soda

  • 2 t ground ginger

Frosting:

  • generous 5 T (75 g) butter

  • 3/4 cup (180 g) heavy cream

  • 1/4 cup + 2 T (75 g) granulated sugar

  • 1/4 cup + 2 T (75 g) packed light brown sugar

  • 1/4 t kosher salt

Directions

  1. Preheat the oven to 325 F. Grease a 9” square cake pan and line with parchment paper.

  2. Put the butter, sugar, syrup, and molasses into a small pan and stir over low heat until melted; let cool slightly. Meanwhile, whisk together the milk and the eggs, then add to the butter/sugar mixture.

  3. Whisk the flour, almond flour, salt, baking soda, and ginger into a large mixing bowl and make a well in the center. Add the liquid mixture, and whisk until smooth.

  4. Pour the batter into the prepared pan and bake for about 1 hour, or until the middle is firm to the touch. Let cool in the pan for about 5 minutes, then turn out and let cool completely on a wire rack.

  5. Make the frosting: put the ingredients into a pan and stir over medium heat until melted. Bring to a boil a simmer for 5 minutes, stirring now and then. Remove from the heat and whisk until the mixture has thickened to a toffee sauce-like consistency. Allow to cool completely, beating occasionally to prevent it forming a sugary skin. Once cold, beat vigorously, until thick and spreadable.

  6. Spoon the frosting onto the top of the cake and spread out in an even layer before swirling with the blade of a knife. Let set before cutting into slices to serve.

adapted from The Farmhouse Cookbook by Sarah Mayor

5872348D-0E88-4C0B-9575-0D3D54DF7B91.JPG

rye coffee cakes with fruit & nut variations!

For whatever the reason, my mind tends to skip over coffee cakes when I think of breakfast pastries. I suppose I like goods that come with a host of variables, flavor options, etc., and messing with the classic butter, sugar, & cinnamon composition seems silly, so it generally just doesn’t enter my thoughts at all....

…until I was sick a few weeks ago, and “taking it easy” for me means spontaneous baking. These two coffee cakes were the result, one with pears and hazelnuts and the other with apples and walnuts, and I just loved them. The flavors and textures come together to yield a really comforting pastry, cozy but also intriguing. I measure deliciousness by how difficult it is to walk away without another bite, and these passed that test all too well.

I was so excited about them, and then was distraught upon realizing that I was in no shape to be out and about sharing food with anyone—except my toddler, the origin of my cold I am sure! Let’s just say I’m looking forward to the rainy day that I pull these out of the freezer for a play date!

B5F826AA-FFA7-457A-B099-CF245257C20B.JPG

Rye Coffee Cakes

Yields one 9” round coffee cake or two 6” round coffee cakes

Streusel:

  • 1 cup (130 g) all-purpose flour

  • 3/4 cup (90 g) rye flour

  • 3/4 cup (160 g) light brown sugar

  • 1 (generous) t kosher salt

  • 1 t cinnamon

  • 1/8 t cardamom

  • 3/4 cup (1 1/2 sticks; 170 g) unsalted butter, cold & cubed

  • 1 cup (120 g) roughly chopped pecans, walnuts, or hazelnuts (peeled)

Cake:

  • 1 cup (130 g) all-purpose flour

  • 1 cup (120 g) rye flour

  • 1 t baking powder

  • 3/4 t baking soda

  • 3/4 t kosher salt

  • 1 t cinnamon

  • 1/2 t cardamom

  • 3/4 cup (1.5 sticks; 171 g) unsalted butter, room temperature

  • 1/2 cup (100 g) granulated sugar

  • 1/3 cup, packed (70 g) light brown sugar

  • 2 eggs, room temperature

  • 1 t vanilla extract

  • 3/4 cup (180 g) buttermilk, room temperature

  • 1/4 cup (60 g) creme fraiche

  • 1 large apple (I used Honeycrisp) or 2 medium pears, cut into 1/2”-1” cubes

Directions:

pre-bake!

pre-bake!

  1. Make the streusel: In a small/medium bowl, whisk together all ingredients aside from the butter. Once thoroughly combined, use your fingertips to work the cold/cubed butter into the mixture until it comes together in small/medium clumps. Add/incorporate the nuts and refrigerate until needed.

  2. Make the cake: Pre-heat the oven to 350 F, and butter one 9” cake pan or two 6” cake pans and line with parchment. Whisk together the dry ingredients in a medium bowl and set aside. Add the vanilla extract to the measured & tempering buttermilk.

  3. In a the bowl of a stand mixer with the paddle attachment, combine the sugars and butter and mix until quite light and fluffy, about 10 minutes. Add the eggs, one at a time, beating thoroughly after each addition.

  4. Add the dry ingredients in three additions alternating with the buttermilk/vanilla, stopping the mixer as soon as each addition is nearly incorporated (to avoid over-mixing), and scraping the sides after each addition. Finally, using a large spatula, fold the creme fraiche into the batter.

  5. Pour into the prepared pan(s), and top with the diced fruit. Sprinkle with the nut streusel and bake for about 1.25 hours (about 45 minutes to an hour for the 6” cakes), or until a skewer inserted into the middle comes out clean, and the top middle of the cake feels firm to the touch. Set on a cooling rack until cool enough to handle safely with a towel or oven mitt, and invert onto a plate (so it catches the streusel) before inverting again, either back to the cooling rack or serving plate. Enjoy!

70C71340-7077-4610-A9F6-B91DBC45EFB6.JPG
77063BAB-ADBF-457F-8438-06150529664D.JPG
75756E09-2791-4C9D-ACF7-C9E65FB33BEA.JPG
DEB8FF01-CC68-4942-8DA5-2BA912D54C15.JPG

hazelnut, honey & pear scones!

I first made these exactly two years ago, in Maine while waiting for Lilly to arrive. I was loving the fall weather and scurrying to pack our freezer with as many wholesome/delicious snacks as possible…these were at the top of that list!

These are inspired by the sugar-free oatmeal maple scones from Flour Bakery in Boston. When I’d first started there in 2011(!), I was blown away by the depth of flavor that came from using a natural sugar source instead of processed. I’ve craved those scones ever since, and have tweaked that recipe here, using honey instead of maple syrup and adding ground hazelnuts, toasted chopped hazelnuts, and pears. And cardamom (it’s true—I am eager to add it to everything).

As with all scone recipes I know and love, I am torn between wanting these with a sprinkle of raw sugar on top, as well as with a glaze. No wrong answer here, and the directions cover both!

2B9F463F-515F-42F6-A0E2-B925A29823E7.JPG

Hazelnut, Honey & Pear Scones

4E7503F8-A91D-4590-BD20-E0582A6A09F6.JPG

Ingredients

  • 1 1/2 c (210 g) AP or whole-wheat flour

  • 2/3 c (65 g) ground hazelnuts (I used Bob’s Red Mill)

  • 1 1/2 t baking powder

  • 1/4 t baking soda

  • 1 t kosher salt

  • 1 t cardamom

  • 3/4 c (65 g) old-fashioned rolled oats

  • 1/2 c (50 g) hazelnuts, toasted and chopped

  • 1/2 c (114 g) cold unsalted butter, cut into 8 pieces

  • 1 pear, ripe but firm, diced into 1/4-1/2 inch pieces

  • 1 cold egg

  • scant 1/2 c (150 g) honey

  • 1/3 c (80 g) cold heavy cream

Directions

  1. Line a baking sheet with parchment paper. I like to freeze the unbaked scones and bake off as needed, so I use a small baking sheet that will fit in the freezer. Otherwise, if baking immediately, use a standard sized pan that will allow for the scones to bake 2-3 centimeters apart.

  2. Whisk together the flour, ground hazelnuts, baking powder, baking soda, salt, and cardamom in the bowl of a stand mixer. Add the oats and toasted/chopped hazelnuts, whisk to combine. Using the paddle attachment and with the mixer on low speed, add the butter and mix until the butter begins to break down and incorporate–about 1 minute (some blueberry sized pieces should still be visible). Scatter the pear dices over the mixture and mix on low until just incorporated.

  3. Whisk together the egg and honey in a small bowl, and gradually whisk in the heavy cream.  Make sure the honey is well incorporated–it’ll want to stick to the bottom of the bowl. On low speed, pour the wet mixture into the dry, and beat for about 10 seconds. Stop the mixer and make sure to scrape all of the wet ingredients into the bowl before returning the mixer to medium speed for about 20 seconds, or until it’s started to come together. It’s important not to overmix the dough, so by all means feel free to take exacting control and finish it yourself with a spatula!

  4. Using a standard muffin scoop or else a 1/2 measuring cup, scoop the dough into rounded portions onto the parchment lined baking sheet, 2-3 inches apart. Put the baking sheet into the refrigerator to rest/chill for 15 minutes, and heat the oven to 350 F.  (Alternatively, scoop the scones closer together on a baking sheet, wrap with plastic, and stash away in the freezer!)

  5. When ready, bake for about 30 minutes, or until the scones are lightly browned on the top, and when “squeezed” (lightly pressed around the sides with your middle finger and thumb), give a bit of resistance (somewhat firm, not doughy).

  6. While scones are baking, whisk up the glaze, if desired. Whisk together 1 cup (140 g) confectioners’ sugar, 2 T honey, and 2 T water all ingredients together, adding more water if glaze seems too thick, adding more confectioners’ sugar if glaze seems too runny. Brush on top of the hot scones when they come out of the oven, and wait about 15 minutes before diving in!

F9DF4A1F-716D-4FEE-BB3A-FD66CBF150FE.JPG